Commercial roofing managers and owners in the Cincinnati to Dayton region that Roofing Annex serves are typically by the many options available for low slope roofs. Before we compare single ply roofing membranes we outline what the three group types…
The post Compare Single Ply Roofing Membranes for Low Slope Commercial Roofs appeared first on Roofing Annex.
]]>Commercial roofing managers and owners in the Cincinnati to Dayton region that Roofing Annex serves are typically by the many options available for low slope roofs. Before we compare single ply roofing membranes we outline what the three group types are. All of them are fairly complex systems and some have strange names or abbreviations to cause more confusion.
Group #1 – Thermoset Membranes
The polymer materials in these single ply roofing membranes chemically crosslink. This means chemical adhesives applied at the seams cures or vulcanizes the membrane strips into one giant membrane. There are several players in this category which is also defined as the synthetic rubber membrane group.
There are five common subcategories of thermoset roof membranes:
- Ethylene propylene diene terpolymer (EPDM)
- Chlorosulfonated polyethylene (CSPE)
- Epichlorohydrin (ECH)
- Neoprene (CR)
- Polyisobutylene (PIB)
The most common thermoset roof membrane is EPDM. This frontrunner of the pack will be our comparison product. Note EPDMs main characteristics:
- Sheet widths range from 7.5 feet to 50 feet wide.
- Sheets are typically 45 mils and 60 mils thick.
- Seams are sealed using liquid adhesives or special formulated tape.
- The membranes commonly are black, but white is available.
Group # 2 – Thermoplastic Membranes
This family of single ply roofing membranes are very like the thermosets, but there’s no chemical cross-linking or vulcanization. The membrane strips are heat or chemical welded to create a single ply. Proper welds are as strong as the material. There are four common subcategories of thermoplastic roof membranes.
- Thermoplastic Olefin (TPO)
- Chlorinated Polyethylene (CPE)
- Polyvinyl Chloride (PVC)
- PVC Alloys or Compounded Thermoplastics
- Copolymer Alloy (CPA)
- Ethylene Interpolymer (EIP)
- Nitrile Alloys (NBP)
- Tripolymer Alloy (TPA)
The most common thermoplastic roof membranes are PVC (chemical weld) and TPO (heat weld). PVC is common simply because it was the frontrunner until TPO came into its own with more adopters. Thus, for this group we will look at TPO when comparing single ply roofing membranes.
TPO membranes are produced by calendering with lamination, extrusion with lamination, or extrusion-coating techniques. TPO sheets are a blend of polypropylene and ethylene propylene polymers and usually are reinforced with polyester. Note EPDMs main characteristics:
- Sheet widths range from 6 feet to 12 feet wide
- Sheets are typically 40 mils to 100 mils thick
- Seams are sealed by heat welded with hot air
- TPO membranes commonly are white but can allow for a colorant
- Flame retardants are added
- UV absorbers and other proprietary substances are added as needed
Group #3 – Modified Bitumen Membranes
These membranes combine asphalt with modifiers and reinforcement materials. They are often a “sandwiched” roofing material. These materials can perform well but they are not as advanced as the other two groups. Many roofers refer to modified bitumens as “torch-down” roofs because a large flame throwing torch melts the asphalt so that seams can be joined together.
There are two types of modified bitumen (MB) roofing membranes:
- SBS polymer-modified bitumen membranes commonly are installed via hot mopping asphalt (similar to BUR systems) or cold adhesive. Some SBS modified membranes are self-adhering; that is, they contain an adhesive backing.
- APP polymer-modified bitumen membranes typically are heat-welded or torch-applied. Consumers should be cautioned that NRCA does not recommend torch-applying a modified bitumen membrane sheet directly to a wood deck.
Generally, APP modifiers impart a “plasticized” quality to asphalt, and SBS modifiers impart a “rubberized” quality to asphalt. MB membranes and EPDM, a thermoset membrane, often are confused by consumers because of colloquialisms used by roofing contractors. MB and EPDM membranes are sometimes called “rubber roofs.”.
Modified bitumen is inexpensive, easy to apply in the case of SBS, and great for DIY types. This combines with its short lifespan make it a non-competitor for larger commercial roofing spaces.
When Comparing Single Ply Roofing Membranes its Really TPO vs EPDM
We think you’ll agree that these two membrane types are already the one you’ve heard the most about prior to this article. If you have a low slop (flat) commercial roof it most likely has a leading thermoset or thermoplastic membrane on it. Now we can get to the simple comparison. Our head-to-head comparison takes into account a range of good to top tier products per each single ply membrane type. We awarded each a plus one or minus one to give a final tally of overall prowess of each membrane type if it gave more options or value – or – had a deficit or negative/detractor.
| EPDM | TPO | |
| Warranty Timespans | 10-35 | 10-35 |
| Warranty strength value | Average | Wide (poor to outstanding) |
| Cost effective | Yes | Yes |
| Lifespan | 20-50 years | 15-50 years (potentially) |
| Thickness range | 45-60 mils | 40-100 mils +1 |
| Maintenance costs (low to high) | Medium -1 | Low |
| Energy savings | Little to none | Light to significant +1 |
| Roof heat buildup in summer | Yes -1 | Little |
| Suitable climate | Colder -1 | Most (cold to hot) |
| Environmentally friendly material | Yes – made of recycled materials | Yes – 100% recyclable |
| Color options | Barely – Black and white | Yes – Many +1 |
| Inexpensive repairs | Typically | Yes +1 |
| Track record (time in use) | Solid +1 | Short track record -1 |
| Sheet size | Medium to huge +1 | Small to medium |
| Chemical resistance | Very poor -1 | Excellent +1 |
| Requires specific skills to install | Yes | Yes |
| Pollution from water runoff | None | None |
| Shrinkage with extreme heat | Some | Some with extreme heat |
| Seam failure level after 10 years | Moderate to low -1 | Very low to none |
| Installation speed | Average | Below to above average -1 |
| Weather rating | Average | Average to very good |
| Tally | -3 | +3 |
When we’re comparing EPDM and TPO products looking at a spread and mean we get a 6-point spread in favor of TPO. As a GAF® Master Select™ roofing contractor, Roofing Annex uses the top rated TPO lines made by GAF, EverGuard™ and EverGuard Extreme™. Combine the best products with top notch installations, and the best warranty, and TPO picks up 2 or 3 more points over the best EPDM.
Not all roofers will agree with this. Some make their money off an expertise with EPDM that goes back decades. Other simply bash TPO to discredit it because of the money to be made on EPDM maintenance and repairs. Some just don’t trust the manufacturers’ claims of longevity since it’s untested out of the lab to last a lifetime. We agree that real world scenarios and time are a risk factor but GAF and independent labs agree that 60 mil EverGuard and EverGuard Extreme, as well as Firestone® TPO products, have no problem handling 37 years of extreme abuse.
A lot of the anti-TPO rhetoric you’ll hear is also based on confusion with thermosets like PVC and the various PVC alloys which have chemically bonded seams. In the past, these seams have had a negative track record. PVC had other pitfalls that would have sunk it below EPDM by a few points in a similar tally. The thermoset family legacy haunts TPO but it is slowly making a significant impact.
Call the commercial roofing pros at Roofing Annex to learn more about upgrading your flat roofing to a TPO membrane from GAF. We can perform an in-depth evaluation of your roof and let you know it’s condition and provide a free estimate for its replacement.
513.685.9092
The post Compare Single Ply Roofing Membranes for Low Slope Commercial Roofs appeared first on Roofing Annex.
]]>Our roofing company, Roofing Annex, serves a sizable territory that spans from Cincinnati to Dayton. With clients coming from all walks of life, the roofs we replace range from small to colossal. Our company specializes in storm damage repair, which…
The post A Roof Replacement Tale – The Homeowner’s Journey appeared first on Roofing Annex.
]]>Our roofing company, Roofing Annex, serves a sizable territory that spans from Cincinnati to Dayton. With clients coming from all walks of life, the roofs we replace range from small to colossal. Our company specializes in storm damage repair, which means our clients tend to fit into a certain mold. Thus, a common roof replacement tale has emerged.
If you’re reading this blog, there’s a strong chance that you are either facing the need for immediate roof repair or you’re seeing signs that indicate repairs will be needed in the near future. In other words, you’ll likely know this story or be living it. Either way, don’t be off-put by generalizations or assortations. The goal of this tale is to help those homeowners who feel lost.
Chapter 1 – Confusion Sets In
As our tale gets underway, we look at two main groups of homeowners. The first is comprised of those who are actively seeking roof replacement, either because their current roof is aged and worn, or due to some glaringly obvious problem that needs to be addressed. Helping this group may seem straight forward, but there’s about a 75% chance this is the first time these folks have had to tackle a roofing project. For those who have dealt with these kinds of repairs before, it’s likely been a while and times have changed – even if it seems like products have not (hint: they have). There is a good chance this type of homeowner is still unsure of how badly they need a new roof. They may have little idea about the cost and they may be overwhelmed by not knowing who to call first.
The lucky few who have been referred to a solid roofer can often get the ball rolling but others need to hunt. The BBB, Angie’s List, Yelp, Google, etc. are great for offering options but the sheer volume of results will leave you picking your roofing specialist at near-random.
There’s more confusion to come for our first group but let’s switch gears and address our primary focal group, the Unsuspecting Homeowners. This is the hardest group to talk to because…well, to be honest, this set of homeowners is actively neglecting their roofing. They may give the bulk of their attention to their interiors, followed by landscaping efforts, and then once every so often, other exterior features get noticed. Typically paint, siding, garage doors, windows, decks, and pretty much everything else comes before the roof and honestly – it’s easy to see why!
For one, the roof is simply out of sight. We see it but how often is it actually in our focal point? We can easily take the structure of our roof for granted. When we do take notice, a quick dismissal may be given because the parts we can see look fine. No visible shingles missing and no apparent water stains inside equates to “all is well”. But is it?
Our Unsuspecting Homeowners might not have the health of their roof at the forefront of their minds, but it’s also possible they just have no idea anything could be wrong with it.
Let’s look at a few common problems that can creep up as our roofs age:
- Shingle Death Age – Shingles have different life expectancies mostly based on the materials used, the weight/thickness of the shingle, and the manufacturer’s engineering. You may have no idea how long your shingles are expected to last, plus there are other variables to change this timing even if you did. How much longer is your roof expected to last?
- Roofing System Death – Shingles are just one component in your roofing system’s many parts. Whereas UV rays are the ultimate agent in the demise of asphalt shingles, the under layers can also be affected by the sun, weather, attic breathing/suffocation, ice dams, critters, mold, fungi, and more. Determining the health and possible true death timing of an entire roofing system takes an expert evaluation.
- Faulty Products – There have been many shingles and accompanying roofing system products that have been total failures. Class action lawsuits and settlements come and go too quickly for most homeowners to know they occurred. The average Joe has little idea of the brand let alone the series of shingles on their roof. The main point here is that your shingles may very well only last a fraction of the time they were meant to. The common problem of massive granule bond failure happening suddenly at a random point is a big issue. Other shingles become extremely brittle and subject to snapping off before they’ve seen their 20th autumn completed.
- Storm Damage – Wind and hail don’t always leave traces of damage that are easily seen or understood. Most people would assume that those little pockmarks are just minor blemishes. That’s not always true and a lot of it has to do with the age of the roof.
- Improper Installation – Roofing companies get to see a lot of cheap mistakes made by weekend warriors and low-grade “roofers”. Missing roofing system components, poor ventilation, and improper fastening are common but there’s one outrageous flub that pops up more than you’d think…we call it Lazy Layering. Lazy Layering is where new shingles are purchased and nailed down on top of the existing ones. Every so often there are as many as 3 layers! This means that the system’s sub layers can be antiques.
When does the confusion set in for our Unsuspecting Homeowners?
- At the first sign of water damage
- When you see that eaves are rotting a little
- When an attic smells like an old musty cellar
- When they see pieces of shingles on the ground
- When their interior ceiling looks like it has streaking stains
- When there is sand that matches the roof color in the gutters
- After a storm ruins half of the roofs on the block but not theirs
- After a few neighbors get their roofing replaced in one summer
- When a canvasser is at your door asking if you’d like to receive a free inspection
- When a lot of mail comes from local roofers
If you’ve ever noticed one or more of the above, you probably paused and thought about your own roof for a moment. You were likely confused or a bit overwhelmed about what to do, who to call, who to trust, or if any of it meant anything at all. The typical homeowner will bury their head in the sands of ignorance and go on with their life until something gets worse.
The Unsuspecting Homeowners will again be confused when their issues worsen or they get more mail about perceived threats. The average homeowner won’t seek help until it’s too late and they’ve suffered more property loss that could have been prevented with a little due diligence. Some homeowners do heed warnings and act at the first sign of a problem and that’s the gist here. Either way, both subsets will now need to place their fate in the hands of a roofer.
Chapter 2 – Confusion Turns to Action
Our two groups now converge as calls are made to roofing companies. Most companies provide a free roof inspection, even in the case of a replacement job, in order to get a lay of the land. Most homeowners will start with two companies and two quotes and get more as needed. No two companies will paint the same picture of the problems, solutions, or pricing. Homeowners will ultimately choose the option they can afford but trust factor, estimate precision/detail, and the warranty offered will have pull for most.
Storm damage and insurance claims can compound homeowners’ confusion but a good roofer will clear that up by being well-versed in the process. A solid roofing company will also provide as much education and assistance as needed to make the repair or replacement project transparent.
Once a roofer is selected and payment concerns are worked out it’s off to the races! It’s time to sit back and relax, but keep one eye open.
Chapter 3 – The Roof Repair Takes Place
Perhaps there was a hiccup or two long the way but the project is done. Now the cycle can repeat itself as years pass (10 to 20 of them) and the roof will be tip top. This is the time that breeds neglect after all.
Chapter 4 – The Moral of our Roof Replacement Tale
GET A ROOF INSPECTION REGUARLY! Location is key here. Those in San Diego can go much longer without a roof inspection compared to Cincinnatians. Southern Ohio sees far more wind storms, large hail, snow accumulation, and humidity – all of which can factor in to an early roof demise. Start getting a bi-annual inspection when your roof is about 12 years old. Once your average high-definition shingle is 20 years old it’s time to switch to yearly examinations. You can even set it up with your roofer to automatically come out!
The End
Or is it? Be proactive and break the cycle of roof neglect. It’s easy and cost-free to be in the know. Good homeowners stay mindful to avoid larger bills down the road.
Call the experts at Roofing Annex today to schedule a property inspection – 513.685.9092
The post A Roof Replacement Tale – The Homeowner’s Journey appeared first on Roofing Annex.
]]>Skylights can be found on just about every other home in the median price range. They’re a functional way to save money, and they nourish the brain by ushering in real sun rays. Like all parts of a home, skylights…
The post Replace Skylights When Replacing Your Roof – Yes or No? appeared first on Roofing Annex.
]]>Skylights can be found on just about every other home in the median price range. They’re a functional way to save money, and they nourish the brain by ushering in real sun rays. Like all parts of a home, skylights have lifespans, but there is one instance that may disrupt the tenure of a skylight: roof replacement. Having to replace a roof is a serious issue, and it certainly brings up the question of whether or not to replace skylights.
If you look around the online forums, you’ll see a good deal of debate on this subject. Roofers, handymen, DIY warriors and homeowners often chime in with conflicting answers like:
- Your skylights will be fine.
- Just add extra caulking around the skylights.
- You’ll need new flashing around the skylights.
- Always replace skylights when installing a new roof.
- Only replace certain types of skylights like the bubble kind.
As an elite roofing contractor with decades of experience, Roofing Annex can safely say that only one of these is the correct answer.
Always Replace Skylights When Getting a New Roof Installed!
We can’t stress this enough! A roof replacement is a big deal. The tear-off phase is certainly going to disturb your skylights. There are no kitten gloves that can stop this. Even the best and newest skylights stand a large statistical chance of being compromised. Wood frame, bubble and plastic panes, and skylights that open are extremely likely to fail.
Be sure to get an expert roof inspection and report that provide details of your skylights. From Cincinnati to Dayton, Roofing Annex is the professional you need!
Call us for a FREE EVALUATION – 513.685.9092
What Goes Wrong With Skylights?
There are several seal points that can be disturbed enough to let moisture in. As always, once moisture gets a foothold, it begins to do one of several things:
- Leaking – Water immediately finds the quickest route in. This is a physical leak that one can observe dripping. A busted seal can be impossible to detect while a roof is replaced. If the problem is small, it will lead to another issue.
- Warping of moistened material – In conjunction with hot and cold temperatures creating swelling, the area affected grows over time. Typically, within a year of your roof replacement, this warping will lead to water staining the ceiling as well as the possibility of actual leaking.
- Rotting – Should rot, lichens or mold find a foothold, the rate at which the affected area swells can be intensified, and leaking will surely occur within 18 months.
Why Don’t New Caulking and New Flashing Help?
There are too many points that could have been blown below these top most protective points. These first defenses do fine with vents and chimneys, but tend to do a poor job securing a skylight for long due to the nature of the skylight being a large, semi-flush and heavy port in a roof.
Is There Any Circumstance in Which a Skylight Can Survive a New Roof?
Obviously, there is always a chance any skylight can make it through a tear-off, but there is only one scenario in which there’s a fighting chance that a skylight will make it. If the skylight meets these points, we’d give it a better than 60 percent chance of survival:
- The house was designed and built with it.
- It is static (non-opening).
- It is a top brand.
- There is now wood used in its construction and boxing.
- The pains are glass.
- It is no more than 10 years old.
How many times have we seen this scenario? Pretty much never as most roofs are over 12 years old by the time they need replacing.
Who’s at Fault for a Leaky Skylight That Isn’t Replaced After a Roof Installation?
Any good roofer will insist that homeowners have their skylights replaced no matter what. A top roofer will not make it mandatory, but they will outline the seriousness of the situation. Ultimately, homeowners are responsible for their skylights, but a solid roofing contractor will always inspect the area if called on to do so.
At roofing Annex, we routinely get calls about a skylight issue about a year after a roof install. It’s on us to take a look and evaluate the situation. Depending on the nature of the damage, we will repair the issue, typically for a fee, or recommend a skylight company to repair or replace the skylights.
A Skylight That Fails a Year After a Roof Is Installed Creates Another Problem!
It may cost a bit less to have a skylight installed during a roof replacement because it’s easier to put it in while the decking is bare. If this isn’t done and leaking ensues a year later, there is going to be a big problem. It won’t be the cost or the hassle, but the fact that now your roofing system will need to be disturbed to repair or install new skylights. Just as the skylights were compromised, now too will your roof face similar issues with blown seals.
Don’t risk your property, wallet and sanity — get your skylights replaced when getting a new roof!
The post Replace Skylights When Replacing Your Roof – Yes or No? appeared first on Roofing Annex.
]]>When it comes to homeowners insurance, most folks have a vague understanding of their policy type and its cumbersome wording. What’s more troublesome is that states that experience hurricanes, tornadoes, and large hail are shifting towards a less favorable type…
The post Insuring 20-Year-Old Roofs is a Growing Problem appeared first on Roofing Annex.
]]>When it comes to homeowners insurance, most folks have a vague understanding of their policy type and its cumbersome wording. What’s more troublesome is that states that experience hurricanes, tornadoes, and large hail are shifting towards a less favorable type of coverage: Actual Cash Value (ACV). Sometimes policies are even switched to ACV in states where weather is the most extreme. Sadly, the most concerning trend in insurance is the requirement of a health check on roofs more than 15 or 20 years old. If there is an issue, you’ll be forced to correct it before getting a standard Replacement Cost (RC) policy or be forced into an ACV policy. Insuring 20-year-old roofs with RC policies is already near impossible in states like Kansas and Florida.
Let’s step back and take a closer look at these two policy types.
As you know, the basic purpose of insurance is to cover a loss that you have suffered. As policy holders, we would like to only pay our deductible on a claim and have all repairs paid for by the insurer. That’s a Replacement Cost policy. It’s often paid in two sums: half up front and the rest when work is completed.
Actual Cash Value takes depreciation into account, in a multitude of ways, to determine what you receive to cover your loss. For instance, a roof predicted to last 30 years will be assumed to have zero value at the end of that timespan. So, if the roof is somehow destroyed 15 years after installation, the ACV will be half of the original cost of the roof.
Actual Cash Value = Replacement Cost – Depreciation
The upswing on these ACV policies is that they are often less expensive than RC and may have a smaller deductible.
The Problem with Insuring 20-Year-Old Roofs
As mentioned, a growing number of insurers will want to look at your roof of 20+ years before covering you. In areas like Cincinnati, where hail and wind tend to destroy roofs twice as fast as average, it behooves profit margins for insurers to look at receipts and warranties of roofs, along with an inspection report, to determine their plan of action. Many new home buyers will be looking at decent older roofs; but a report may say different, and the outcome may be a replacement request to access an RC policy. Most people with low finances will opt into an ACV policy and enjoy lower premiums, while a few may still be able to obtain an RC but have an inflated premium due to the poor condition of the roof.
Other hard to insure home types
Why is 20 the magic number of years? The average life expectancy of asphalt shingles is 40 years. Hence, the half-life point is a good place for insurers to start. But there’s more to it, and there’s a reason why some insurance providers want to look at roofs at 15 years of age. This is the age at which the elements start to drastically affect the average asphalt roof. At around 12 years most shingles will begin to get stiff/brittle and the granules coating the surface will slowly lose their hold. This natural aging is not the ACV depreciation factor insurers are looking at, simply the intelligent point to be careful and opt for an inspection.
Anyone with an older roof that fails an inspection should look into full replacement even if there are just small repairs requested. Why? It’s a great investment that will:
- Make it easy to acquire an RC policy
- Lower your premiums
- Add value to your home on resale
- Beautify you home
Learn how else you can cut insurance costs here
ACV Insurance Claim Payout Example
An ACV policy subtracts the depreciation from the replacement cost. Thus, insuring 20-year-old roofs with issues is great for insurers. They know total failure is around the corner and are ready to help out and still be in the black. The following scenario should make it clear how this policy works:
Joe buys a 20-year-old home with its original roof and seeks homeowners insurance. His insurance agent schedules an inspection due to the age. The report shows that there is a good deal of granule loss and some notable wind damage…this is Cincinnati after all. The agent requests that Joe pay to repair the wind damage at the cost of about $1,500 or replace the roof before the home can be covered by an RC policy. The agent will likely omit the part about saving on premiums with a new roof, but will highlight the high cost that just repairing the roof will leave. Then the ACV option will come out. Depending on the insurer, the repairs may still be needed as age and the degree of the issues will factor in.
Joe—who knows nothing about roofing—looks at his roof, which appears fine to him, and thinks about saving that $1,500 and another $300 a year with the ACV policy. He makes the cheap call. Joe’s happy and feels safe; but then a hailstorm destroys his roof five years later. Just as water damage is starting to show, he calls his agent to schedule an inspection.
After the inspection, Joe gets a call from his agent with the prognosis. He’s informed that the roof is totaled and the “like kind and type” roof replacement will cost $14,000. Joe’s first question is: “How much will this cost me?” This is where it gets yucky with his ACV policy.
The original roof cost $10,000 and came with a 40-year warranty. The policy took the depreciation factor to mean that the now 25-year-old roof lived 62.5%. This was applied against the original price of the roof to give the depreciated roof value of $3,750 and a depreciation value of $6,250.
Hence, the agent said: “We’re paying the repair cost of $14,000 minus the roof’s current depreciation value of $6,250 minus the $1,000 deductible.” That left Joe having to pay for the other $7,250 to have his roof replaced.
Did that make sense?
No? Say the roof was only 10 years old and had a 50-year warranty. The depreciation value of the $10,000 roof would be $2,000 (20%).
$14,000 Repair – $2,000 Depreciation – $1,000 Deductible = $11,000 paid toward repairs by ACV policy.
This new roof scenario isn’t bad, plus it made the premiums as low as possible. The same equation is used for all other losses in the home and its contents.

Insuring 20-year-old roofs is often even harder if small repairs are needed.
What did we learn from all of this?
- Insuring 20-year-old roofs is getting harder.
- ACV policies are cheaper but leave you paying a lot more when disaster strikes.
- A new roof will save you money on premiums—especially if the warranty is for 50 years.
The post Insuring 20-Year-Old Roofs is a Growing Problem appeared first on Roofing Annex.
]]>Winter is usually associated with cold drafts, but it’s actually spring winds that create the most noticeable drafts in a home. As a full-service restoration company serving the Cincinnati area, we are accustomed to isolating and fixing drafty windows. Sometimes…
The post DIY Series: Fixing Drafty Windows appeared first on Roofing Annex.
]]>Winter is usually associated with cold drafts, but it’s actually spring winds that create the most noticeable drafts in a home. As a full-service restoration company serving the Cincinnati area, we are accustomed to isolating and fixing drafty windows. Sometimes it turns into a window replacement project, but often a window’s draft can be fixed quite simply.
When tackling this annoying and costly problem, the first thing to do is find the source.
Locating the Leak
Determining which window(s) are working against you can be tricky. But we have a tip to make it easier! Perceived drafts and actual air leaks can be similar. AC vents may mimic the appearance of a window draft, and old single-pane windows often emanate cold so much that it feels like a draft.
Our favorite trick is an oldie but a goodie: Candle flame! This easy method can detect if you have a draft in your home and where it’s coming from. Before you light the candle, make sure all windows in your home are closed and locked. Then make sure your central air is turned off. Next, light a candle and hold it next to each window, moving the candle near the seam. If the flame flickers, then you most likely have an air leak.
DIY Fixes to Save Money on Replacing Drafty Windows
There are several low-cost ways to tackle an air leak; some are temporary fixes, while others are more permanent solutions.
- Caulking – Tubes of caulk are inexpensive and, with practice, become easier to use. Make sure you caulk the window inside and outside, where the window meets the casing and where the casing meets the wall or siding material.
- Weather stripping – This option is more affordable, and an easy solution for those who love to DIY. You can purchase the material for a few dollars per window at your hardware store of choice. Cut the strips to size, and fill the gaps between the window sash and jamb.
- Curtains – You may think curtains are just for looks and keeping out the sun, but they are also useful for insulation. Replacing lightweight curtains with a heavier material can help your curtains act as a trap, catching air between the layers of fabric to provide insulation.
- Draft snakes – This product is a fabric tube, which can be placed on the windowsill or under a door to keep out chilly air. This is our least favorite option, but may be the right one for you
RELATED BLOGS
5 Signs You Need New Windows
How to Prevent Window Condensation
Replacing vs. Fixing Drafty Windows
Replacing your windows can be a little pricey; but installing the right windows can increase the value of your home. For instance, Energy Star windows can lower your bills by 7 to 15%. Only a trusted professional window installer who can pinpoint and correct or minimize drafts—as well as create a tighter seal around the window—should replace your windows. Here are a few common types of window vulnerabilities that you should be on the lookout for:
- Single–pane windows – Older, single-pane windows are the least energy efficient and usually allow heat to escape.
- Hinge and lock defects – If your windows do not open or close properly, it is usually a sign they are ready to be replaced.
- Irregular condensation – Condensation between windowpanes means your windows are not functioning properly. If one window gets more condensation than others, it may have an issue as well.
Need to Replace Your Windows?
Contact Us Today to Schedule an In-home Consultation – 513.685.9092
The post DIY Series: Fixing Drafty Windows appeared first on Roofing Annex.
]]>Let’s face it, summers are for entertaining, playing, vacationing, and yes, home care. “Chores” is an ugly word but if you tackle the items on our summertime home chores checklist you’ll be both proud and ready for the year to…
The post Summertime Home Chores Checklist appeared first on Roofing Annex.
]]>Let’s face it, summers are for entertaining, playing, vacationing, and yes, home care. “Chores” is an ugly word but if you tackle the items on our summertime home chores checklist you’ll be both proud and ready for the year to come.

#1 – Wash Those Windows
We must put this at the top of our summertime home chores checklist because it’s entertaining season. The typical household entertains on no less than four occasions from June to September. Get that glass sparkling with a bucket of soapy water, a sponge, and plenty of elbow grease. Get the whole family involved if possible! Turn it into a water fight if you must. Then, go back over with some Windex to make it look like pro job. Speaking of “pros”, don’t be afraid to call for help if the size of the job is just too daunting.
Need a professional? We recommend United Window Cleaning to Cincinnati residents.

#2 – Replace or Clean Air Conditioner Filters
If you haven’t gotten around to it yet, it’s high time to get those filters refreshed. If your filters look okay, go ahead and use the hose on your vacuum to remove dust from them and the housing and grate. Also, be sure to restrict some of your downstairs vents in naturally cool areas to allow the cooler air upstairs to work its way down to regulate a consistent home temperature.
Hit a snag with your AC not working? Contact Apollo Home in Cincinnati for help.

#3 – Power Wash the Driveway, Patio, and Walkways
Weeds, debris, and moss may have taken over your traffic areas but that’s an easy fix! If a broom and garden hose are not enough, it’s easy to get out the power washer. In most cases, a power washer is the best tool for removing weeds from cracks in pavement or pavers. It should destroy the roots and wash the problem away in one shot. Mildew and grime areas do take a little more time, but the color change is most gratifying.
Need to rent a power washer? Try Econ-O-Wise Rental in Mason.

#4 – Inspect That Attic
It’s no fun, but summertime is the best time to check your attic for any indication of pests or insects, water leakage, mold, or mildew. Also, be sure to turn off the lights to check for any sign of light peeking in where it shouldn’t. It’s a clever idea to do your inspection on a sweltering yet breezy day to note how your attic is breathing. If it’s stale and unholy hot, you may want to have a roofer look at the venting situation.
Call on Ace Exterminating in Cincinnati for help with any creepy crawlies!

#5 – Clean & Set Ceiling Fans to Down/Counter-Clockwise
Before flipping the switches to reverse the air flow, be sure to clean the fan blades. If you don’t, you may end up with a fresh crop of dust bunnies. We recommend the pillowcase technique. This requires a step ladder and an old pillowcase. Simply stuff a blade into the case, pinch down the open side to squeeze against the blade, and pull towards the blade tip. This is the best way to contain that dust buildup!

#6 – Clean or Replace Window Screens
Get out a bucket of soapy water, a hose, and a softer scrub brush, then pop off those screens. We recommend laying them down on the patio first before blasting them with water for a moment. Then, scrub with the brush doused in soapy water. Finally, hit them again with the hose and stand them up to dry for a couple hours before replacing. If there are too many holes or if this cleaning treatment damaged older screens, then it’s time to buy replacements.

#7 – Touch-Up Painting
This is a quick outdoor home maintenance must that will give a boost to your home’s exterior appearance. Now that it’s warm enough to work outside, you can finally touch-up the paint on the outside of your home. Hopefully you still have some cans left over from your last painting. If not or if you can’t remember the exact color of your home, you can ask a paint professional at your local paint store to come out and help you find the perfect match.
Other Possible Projects to do Doing During the Summer
These items may not apply to you but they are great reminders of things to check on:
- Deck Re-Staining
- Pool Maintenance
- Garage Cleaning
- Roof Inspection
- Review All Hoses (Washers, garden, etc.)
The post Summertime Home Chores Checklist appeared first on Roofing Annex.
]]>It’s safe to say that our restoration experts have inspected thousands of roofs in the Cincinnati and Dayton area over the last few years. In that time, we’ve see a lot of DIY projects go horribly wrong on windows, doors,…
The post The 7 Worst Roof Repairs Homeowners Perform appeared first on Roofing Annex.
]]>It’s safe to say that our restoration experts have inspected thousands of roofs in the Cincinnati and Dayton area over the last few years. In that time, we’ve see a lot of DIY projects go horribly wrong on windows, doors, ventilation, siding, and, of course, roofing. In no particular order, we present the 7 worst roof repairs homeowners perform to a startling degree.
- Reroofing by adding a new layer of shingles: We’ve torn off roofs with 3 layers of shingles before. The homeowners usually site that they just wanted a new color or that their roofer told them it was a totally okay money saver. All it takes is the old bottom layer to have an issue and the whole roofing system fails. The extra cost associated with the removal time and disposal is cringeworthy. This may be the worst thing we’ve seen particularly due to the wasted money spent on the short lived second and possible third layers. Of the worst roof repairs homeowners perform, this one can cost the most in the long run.
- Trimming all parts of a tree except for those overhanging the roof: Perhaps the roof makes it too hard to reach branches with an extension trimmer or perhaps it’s just negligence. You never want branches hanging over your roof. This is asking for clogged gutters that fail and for moss growth on the shingles. Non-repairs equate to our second issue…
- Power washing roofs to remove moss: Some homeowners take this a step further and sprinkle bleach on the affected area. Both these “cleaning” techniques are highly destructive to shingles… Not to mention unsafe!
- Cleaning gutters from the ground: It’s easy to spot a gutter that was improperly cleaned with an extension poll or extension hose. Sludge is often built up thick in the worst points possible. It then takes just a few bits of debris to cause a A plugged-up gutter is heavy! It can literally snap, burst, or break free from the roof. In some cases, we’ve seen gutters take pieces of the roof with it when it collapses.
- Pulling up shingles to look for leaks: Yes, most people wouldn’t do this but it’s been done before. We often see caulking and other repairs under shingles during tear-offs. This is just asking for more leaks!
- Adding or repairing skylights: This is not a clever idea unless you do it for a living. Skylights are one of the leakiest components to a roof there is.
- Doing anything to ports, vents, or chimneys. This follows skylights as being something left to a professional. Chimneys feel particularly safe to work near and on which is why the roofing around them tend to suffer. Tools, shifting around, debris, and damage to its flashing are common issues that can be worrisome.

There are a few rules to roof maintenance. They are constantly broken and end up costing homeowners more down the road. We hope you avoid the following:
- Walking on your roof – no matter the grade
- Power washing
- Patching leaks from the roof surface
- Ignoring overhanging foliage
We hope you avoid the mistakes we’ve shared here and seek a professional before combating your roofing issues.
Need to Replace Your Windows?
Contact Us Today to Schedule an In-home Consultation – 513.685.9092
The post The 7 Worst Roof Repairs Homeowners Perform appeared first on Roofing Annex.
]]>Raised bed gardening is a wonderful way for novice gardeners to earn their green thumb. When spring comes to Cincinnati and Dayton it’s time to plan the summer crops and prep beds. Whether starting from scratch, redoing, or replenishing your…
The post Raised Bed Gardening – Soil Prep appeared first on Roofing Annex.
]]>Raised bed gardening is a wonderful way for novice gardeners to earn their green thumb. When spring comes to Cincinnati and Dayton it’s time to plan the summer crops and prep beds. Whether starting from scratch, redoing, or replenishing your raised beds, this soil preparation guide will help make your efforts pay off at harvest.
First, the Benefits of Raised Bed Gardening
For simple backyard gardening, there are several reasons to choose the raised bed method:
- Your body. The best part of using raised beds is that they are closer at the hands. Planting, weeding, and harvesting requires less strain to your body.
- Perfecting the soil. The nutrients in your yard’s soil may not be adequate for growing vegetables, herbs, melons, or squash. Some of the soil in the Cincinnati area contains heavy
- Raised beds look more attractive than a tilled yard.
- You can place your garden on your patio if space is limited.
- Better Crops. Root crops such as potatoes, carrots, beets, and radishes thrive in the looser soil of raised beds. Some crops don’t do as well in raised beds but there are always tricks to aid this.
- Rain water can damage young plants due to pooling or erosion. Spring in the Cincinnati and Dayton area can be fraught with wind driven rain that raised beds protect against.
Before Your Soil Prep
There are multiple types of raised beds to choose from and then there is the option to line your bed basin or let it flow. Shallow beds placed on bare earth are the easiest choice because they cost less in parts and larger plants can tap into the base soil for greater strength. You can line the base with the very bags you bought your soil in, if you wish to slow down the water exiting but properly mixed soil will hold the moisture where it’s needed anyhow.
If you’re starting from scratch or redoing your bed, be sure that you give the dirt under your box a good quick tilling with a hoe. Loosened up soil will absorb water under your box rather than letting it leak outward.
What You’ll Need to Purchase or Have on Hand
There are tools and of course the soil to purchase that need gathering. It’s up to you to measure your bed(s) to know the volume needed but it’s wise to go a little overboard in your estimating. Here’s what you’ll need:
- 5-gallon bucket or wheel barrow. For transporting onsite dirt or compost to your bed.
- Standard Shovel
- Garden Shovel
- Row Rake
- Hose with watering wand attachment
- Potting Soil – Buy one of every vegetable garden type you see at your supplier and be sure they say organic. You may only have 2 or 3 options so keep an equal ratio depending on your volume needs. This means a greater cross section of nutrient types will be accounted for – even if one claims to have it all. This soil is formulated to retain water but gives out after a couple seasons.
- Manure – Buy one bag of manure per every 3 equal size bags of soil. Again, it’s good to buy various kinds. A standard mixed cattle manure is the easy choice here. Potting soil has most of what young plans need to start thriving but as the plan matures to start producing the bulk of these soils will fall flat. Manure is the food they crave as long as it’s not too much.
- Worms (possibly) – more to come on that


Soil Preparation
The best soil mix starts with some good soil on hand so hopefully you have a pile to pull from. The number one thing you can do for your beds is to introduce worms to it. If you have a compost pile or a spot in your yard you know you can dig up some earth worms then get to it. A wheel barrow load of compost per-bed is optimal. If you are without this resource you can buy worms online.
You’ll want to place your local worm ridden soil or compost down first. Gently spread it around the base of your bed(s), give it a quick soaking before moving on. You want your crawlies moving both up and down, plus you don’t want them getting hurt during the mixing stage.
Note: If you don’t have worms in your soil or compost it is likely that you have poor soil on your property. Perhaps you must aerate, fertilize, and water your lawn very regularly or it dies.
Using What’s on Hand
You can also utilize some more earth from your yard if you want to ease the cost of buying potting soil. As long as the local or imported topsoil doesn’t represent more than a third of your soil you should be fine. There may be nothing wrong with your soil other than having rocks or too much clay. The point here is that this dirt may just not be what the roots of your average plant want to grow in.
The Mixing Stage
- Open the bags of soil and manure alongside your bed(s).
- Bring any local dirt close via bucket(s) or barrow.
- Dump in 2 potting soil (or local dirt equivalent) and one manure then mix via row rake.
- Wash and repeat once or twice if you have a large bed.
- You’ll be left with room for your last bag or two of soil. This goes on top of the two mixed layers. The manure should be deeper where the roots feed.
- Give your planter a bath… Literally. Clean off your bed edges and dampen the soil.
- You’re ready for planting


Planting your Raised Bed Garden
If planting from seeds you’ll want to follow directions on the packaging for the Southern Ohio area. If planting from starters be sure that you get some tips on them from experts at your local garden center or nursery. Even though raised beds do protect your sprouts from rain, Cincinnati and Dayton also see a good amount of hail in the Spring. Starters stand a much better chance against hail strikes.
Best of luck gardening!
Looking for an Exterior Restoration Expert?
Call on Roofing Annex to improve your property – 513.685.9092
The post Raised Bed Gardening – Soil Prep appeared first on Roofing Annex.
]]>For many Cincinnati suburbanite homeowners, lawn care is a big issue due to their sprawling grassed property size. As winter fades it can become obvious that help is needed, even if a mowing service is already called to action. Irrigation…
The post Spring Lawn Care Tips for Cincinnati appeared first on Roofing Annex.
]]>For many Cincinnati suburbanite homeowners, lawn care is a big issue due to their sprawling grassed property size. As winter fades it can become obvious that help is needed, even if a mowing service is already called to action. Irrigation concerns, fertilizing needs, and aeration needs become just as important as keeping up with the fast-growing blades and weeds. As your partner in all things home and garden related, Roofing Annex is On Top Of It All™ with sharing a multitude of lawn care tips to make for a successful green season in Cincinnati.
Spring Lawn Care Checklist
The following lawn care tips should get you up and running:
- Take stock. Take a good look at your lawn as the season changes. Puddles may form where they had not been before. Sprinkler heads that have been quiet for months and are now being called upon. The soil may appear compacted. There are numerous factors to pay attention to that may have bearing on your lawn’s health.
- Tool prep. Check that your lawn mower is working properly. Inspect the blades, fluid level, and the filter. Look over your rake(s), shovels, weed whacker, leaf blower and other equipment to be sure they’re in good condition.
- Stock up. Once the you know what concerns you may have be sure to buy things you may need – such as:
- Grass seed
- Weed killer
- Fertilizer
- New tools
- Irrigation Supplies
- Cleanup. Rid your lawn of dead grass, leaves, branches, twigs and any other debris.
- Aerate. If your thatch was heavy or your soil appears to be compact it is time to aerate. Lawn aerator sandals are great for anyone weighing over 150 pounds. Of all of our lawn care tips, aerating tends to be the biggest must for the Cincinnati area.
- Flush away salt deposits. Over the winter many homeowners damage their lawns with salt buildup. This can be fixed with a couple longs sessions of soaking the area to purge the salt from the roots. A sprinkling of fresh soil and fertilizer in these areas is a clever idea if they still look damaged.
- Begin mowing. During the spring, it is wise to cut your lawn just a hair shorter than summer and fall so that fertilizer and new grass seeds can get where they need to. It also helps with aeration, germination, and spotting weeds.
- Giving your grass some fresh nutrients in the spring will keep your lawn going strong through to fall.
- Fall is actually the ideal time to seed a lawn as that is natures intent, but spring is the next best thing. If your lawn wasn’t as lush as you’d have liked it last year, it is a wise choice to sprinkle on a little extra grass seed.
Spring Lawn Care Tips for Dog Owners
Sure, children, foot traffic, and poor irrigation can damage a lawn, but man’s best friend usually takes the prize. However, a lawn and landscaping can also be just as harmful to your pet. Both concerns are real and we have solutions for both.
Unfortunately, some dog breeds have certain behaviors that are downright uncontrollable. Digging can be trained out of some canines but digging/ferreting breeds are near impossible to brainwash. The best suggestion here is to leave a raw dirt area tucked away in some part of your yard that they can access to get out their compulsion with.
Obviously, the number one issue with dogs and lawns are the burn spots left by their urine. Most homeowners don’t know it but there are easy preventative solutions to this that have to do with what your pooch eats or drinks. There are paramagnetic igneous rocks that you can place in your pet’s water bowl that lower the nitrate levels in their urine. There are also soft chews you can feed Fido to curb that yellowing grass via safe amino acids and enzymes. Both are inexpensive and your doggie will love the chews. (These products are our favorite lawn care tips)
For your pup’s safety, we recommend being careful with your lawn care chemicals. Certain pesticides, insecticides, and herbicides are unsafe for animal consumption. Pets should be kept inside after application while the products dry and should be taken to the vet immediately in the instance that they do consume any of these materials. Fertilizer and mulch can both be dangerous to your animals when consumed in large portions. Many pets find organic fertilizer to be delicious. Often filled with blood and bone meal and fish byproducts, organic fertilizers make a tasty snack for dogs but can wreak havoc on their digestive systems. Opt for pet-friendly products instead. Avoid mulch with cocoa as this particular formula smells sweet and contains theobromine, the ingredient found in chocolate that is toxic to dogs.

The best lawn care tips we can give come in the form of recommendations. Here are a few locals to contact for your green grass goals:
- TruGreen utilizes science-based solutions for guaranteed healthy lawns, shrubs, and tress.
- TriState Water Works will get your irrigation maximized like nobody else around.
- Lawn Brother Lawn Care is notoriously efficient and well-priced lawn mowing, blowing, and edging experts.
- Blades to Petals are expert landscape installers, provide amazing maintenance, and do raised bed gardens as well.
- Dunham’s Lawn Care specializes in mowing, trimming, edging, and debris cleanup.
- Liapis Landscape & Design are landscaping experts who also provide mowing services and turf care solutions.
- MD lawn & Property Services is a full-service landscape maintenance and installation company.
Looking for an Exterior Restoration Expert?
Call on Roofing Annex to improve your property – 513.685.9092
The post Spring Lawn Care Tips for Cincinnati appeared first on Roofing Annex.
]]>Most homeowners think style, color, or price is the most important feature when looking to replace their roof. Nothing could be further from the truth, as none of those will protect your home. There are 3 symbiotic components that make…
The post The Truth About Roofing Warranties appeared first on Roofing Annex.
]]>Most homeowners think style, color, or price is the most important feature when looking to replace their roof. Nothing could be further from the truth, as none of those will protect your home. There are 3 symbiotic components that make a roofing system one of true value; The products, the roofer, and the manufacturer of the roofing system components who backs it all via a great warranty.
Allow us to sum this all up and explain why we offer “The Last Roof You’ll Ever Need”.
The Best Roofing Products Come from those Who Strive to Be the Best
GAF, North America’s largest manufacture of shingles and full roofing system components, carries the best accolades in the industry. GAF has sought to make better and better products through solid research and development. They have more options, a better reputation, and finer warranties than any of their competition. It’s no wonder they get stamps of approval from Better Housekeeping every year.
Manufacturer Backed Roofers are Superior
When a manufacturer like GAF designates a roofing company with a title like Master Elite Contractor, they are saying that they have total confidence in that roofing company to provide a perfectly installed roofing system. Out of the countless roofers in the Cincinnati region and beyond, only 2-3% of those roofers make this cut. Roofing Annex is proud to be among those 2-3 % and has maintained this title along the highest reviews from customers polled by GAF out of those few. This certification also allows us to offer 2 exclusive warranties from GAF. They do come with price tags as GAF will come out to inspect the work before issuing the warranty. Unlike most roofers, Roofing Annex covers the cost of one of these warranties to ensure each roof is backed up.
A Warranty with Real Value
A standard roofer without manufacturer certification will have a 1-5-year workmanship warranty of their own and product warranty on the shingles that will last 20-50 years depending on the manufacturer. The problem with that is that the roofer may cause an issue that voids the manufacturer’s warranty. This puts them on the spot and if they’re a young company with a few instances of fault there is a chance they won’t even be in business to honor their own warranty for that period.
Studies have shown that over 35% of new roofs installed by non-certified roofers fail within 5 years. Couple this with the fact that most roofing companies are not in business more than 6 years which resolves in a big problem.
GAF trusts their products to last and they trust their Master Elite roofers to install them correctly. They prove this with their warranties. The following breakdown highlights the many pluses of the GAF warranties alongside the average industry warranty.
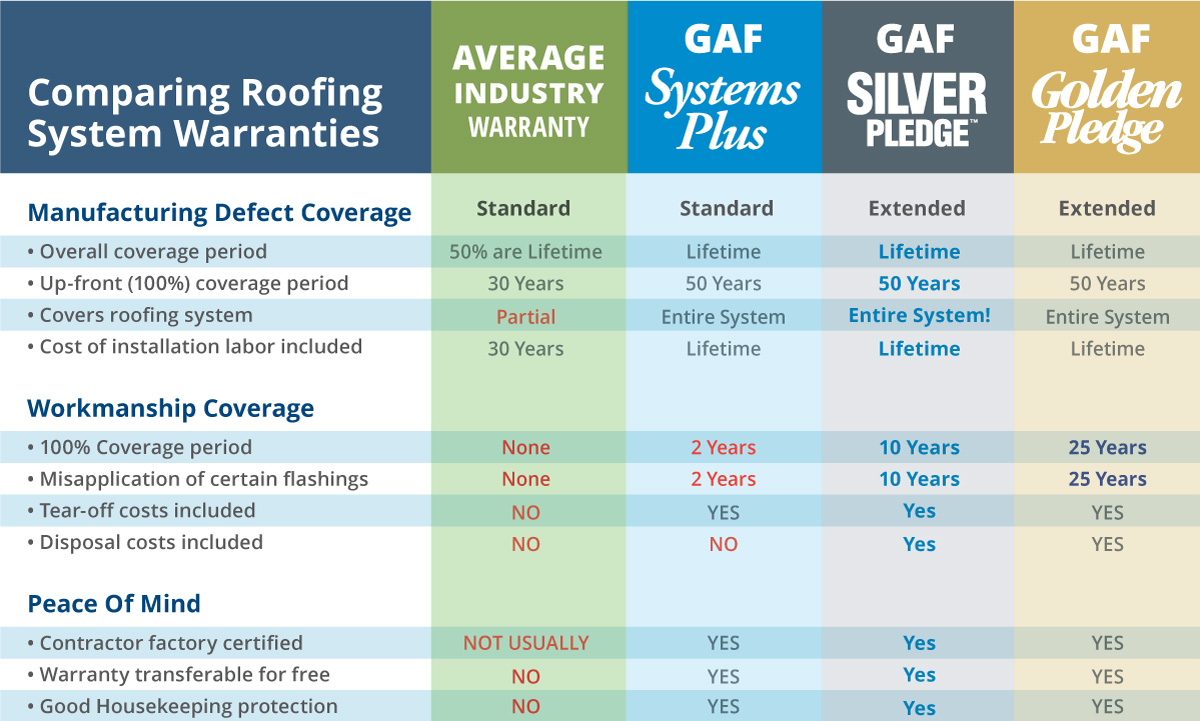
The sad truth about roofing warranties from other manufacturers is that they don’t cover you for much. Many shingle manufactures just make the shingles and leave out other roofing system components. This in turn means that they probably have no extended warranty or roofer certification. This leaves you having to trust that your roofer is impeccable. The average warranty just doesn’t compare to the basic GAF Systems Plus Warranty.
Perspective
A perfectly installed A+ roofing system with a great warranty is obviously the most important choice. It can obviously be the color and shingle design you’re looking for and the price doesn’t have to stink either. A roof isn’t like buying any name brand of peanut butter that tastes about the same as the generic names. It’s much more like buying a car. Some are high quality and overpriced while a Honda has all the safety features, reliability (maybe more), comfort, and a fair price tag. A new car comes from certified dealership (like a roofing manufacturer) and comes with a warranty. A used car can obviously be an excellent value but they don’t come with good warranties if any at all.
Truth about roofing warranties is simply that they are not anywhere near equal. Thus, it’s important for consumers to shop for a roofer backed by the likes of GAF, CertainTeed, or Owens Corning.
Looking for a roofing contractor in the Cincinnati or Dayton area? Roofing Annex is ready to address your roofing concerns with world-class service, solutions, and warranties.
Online Scheduling – 513.685.9092
The post The Truth About Roofing Warranties appeared first on Roofing Annex.
]]>