Commercial roofing managers and owners in the Cincinnati to Dayton region that Roofing Annex serves are typically by the many options available for low slope roofs. Before we compare single ply roofing membranes we outline what the three group types…
The post Compare Single Ply Roofing Membranes for Low Slope Commercial Roofs appeared first on Roofing Annex.
]]>Commercial roofing managers and owners in the Cincinnati to Dayton region that Roofing Annex serves are typically by the many options available for low slope roofs. Before we compare single ply roofing membranes we outline what the three group types are. All of them are fairly complex systems and some have strange names or abbreviations to cause more confusion.
Group #1 – Thermoset Membranes
The polymer materials in these single ply roofing membranes chemically crosslink. This means chemical adhesives applied at the seams cures or vulcanizes the membrane strips into one giant membrane. There are several players in this category which is also defined as the synthetic rubber membrane group.
There are five common subcategories of thermoset roof membranes:
- Ethylene propylene diene terpolymer (EPDM)
- Chlorosulfonated polyethylene (CSPE)
- Epichlorohydrin (ECH)
- Neoprene (CR)
- Polyisobutylene (PIB)
The most common thermoset roof membrane is EPDM. This frontrunner of the pack will be our comparison product. Note EPDMs main characteristics:
- Sheet widths range from 7.5 feet to 50 feet wide.
- Sheets are typically 45 mils and 60 mils thick.
- Seams are sealed using liquid adhesives or special formulated tape.
- The membranes commonly are black, but white is available.
Group # 2 – Thermoplastic Membranes
This family of single ply roofing membranes are very like the thermosets, but there’s no chemical cross-linking or vulcanization. The membrane strips are heat or chemical welded to create a single ply. Proper welds are as strong as the material. There are four common subcategories of thermoplastic roof membranes.
- Thermoplastic Olefin (TPO)
- Chlorinated Polyethylene (CPE)
- Polyvinyl Chloride (PVC)
- PVC Alloys or Compounded Thermoplastics
- Copolymer Alloy (CPA)
- Ethylene Interpolymer (EIP)
- Nitrile Alloys (NBP)
- Tripolymer Alloy (TPA)
The most common thermoplastic roof membranes are PVC (chemical weld) and TPO (heat weld). PVC is common simply because it was the frontrunner until TPO came into its own with more adopters. Thus, for this group we will look at TPO when comparing single ply roofing membranes.
TPO membranes are produced by calendering with lamination, extrusion with lamination, or extrusion-coating techniques. TPO sheets are a blend of polypropylene and ethylene propylene polymers and usually are reinforced with polyester. Note EPDMs main characteristics:
- Sheet widths range from 6 feet to 12 feet wide
- Sheets are typically 40 mils to 100 mils thick
- Seams are sealed by heat welded with hot air
- TPO membranes commonly are white but can allow for a colorant
- Flame retardants are added
- UV absorbers and other proprietary substances are added as needed
Group #3 – Modified Bitumen Membranes
These membranes combine asphalt with modifiers and reinforcement materials. They are often a “sandwiched” roofing material. These materials can perform well but they are not as advanced as the other two groups. Many roofers refer to modified bitumens as “torch-down” roofs because a large flame throwing torch melts the asphalt so that seams can be joined together.
There are two types of modified bitumen (MB) roofing membranes:
- SBS polymer-modified bitumen membranes commonly are installed via hot mopping asphalt (similar to BUR systems) or cold adhesive. Some SBS modified membranes are self-adhering; that is, they contain an adhesive backing.
- APP polymer-modified bitumen membranes typically are heat-welded or torch-applied. Consumers should be cautioned that NRCA does not recommend torch-applying a modified bitumen membrane sheet directly to a wood deck.
Generally, APP modifiers impart a “plasticized” quality to asphalt, and SBS modifiers impart a “rubberized” quality to asphalt. MB membranes and EPDM, a thermoset membrane, often are confused by consumers because of colloquialisms used by roofing contractors. MB and EPDM membranes are sometimes called “rubber roofs.”.
Modified bitumen is inexpensive, easy to apply in the case of SBS, and great for DIY types. This combines with its short lifespan make it a non-competitor for larger commercial roofing spaces.
When Comparing Single Ply Roofing Membranes its Really TPO vs EPDM
We think you’ll agree that these two membrane types are already the one you’ve heard the most about prior to this article. If you have a low slop (flat) commercial roof it most likely has a leading thermoset or thermoplastic membrane on it. Now we can get to the simple comparison. Our head-to-head comparison takes into account a range of good to top tier products per each single ply membrane type. We awarded each a plus one or minus one to give a final tally of overall prowess of each membrane type if it gave more options or value – or – had a deficit or negative/detractor.
| EPDM | TPO | |
| Warranty Timespans | 10-35 | 10-35 |
| Warranty strength value | Average | Wide (poor to outstanding) |
| Cost effective | Yes | Yes |
| Lifespan | 20-50 years | 15-50 years (potentially) |
| Thickness range | 45-60 mils | 40-100 mils +1 |
| Maintenance costs (low to high) | Medium -1 | Low |
| Energy savings | Little to none | Light to significant +1 |
| Roof heat buildup in summer | Yes -1 | Little |
| Suitable climate | Colder -1 | Most (cold to hot) |
| Environmentally friendly material | Yes – made of recycled materials | Yes – 100% recyclable |
| Color options | Barely – Black and white | Yes – Many +1 |
| Inexpensive repairs | Typically | Yes +1 |
| Track record (time in use) | Solid +1 | Short track record -1 |
| Sheet size | Medium to huge +1 | Small to medium |
| Chemical resistance | Very poor -1 | Excellent +1 |
| Requires specific skills to install | Yes | Yes |
| Pollution from water runoff | None | None |
| Shrinkage with extreme heat | Some | Some with extreme heat |
| Seam failure level after 10 years | Moderate to low -1 | Very low to none |
| Installation speed | Average | Below to above average -1 |
| Weather rating | Average | Average to very good |
| Tally | -3 | +3 |
When we’re comparing EPDM and TPO products looking at a spread and mean we get a 6-point spread in favor of TPO. As a GAF® Master Select™ roofing contractor, Roofing Annex uses the top rated TPO lines made by GAF, EverGuard™ and EverGuard Extreme™. Combine the best products with top notch installations, and the best warranty, and TPO picks up 2 or 3 more points over the best EPDM.
Not all roofers will agree with this. Some make their money off an expertise with EPDM that goes back decades. Other simply bash TPO to discredit it because of the money to be made on EPDM maintenance and repairs. Some just don’t trust the manufacturers’ claims of longevity since it’s untested out of the lab to last a lifetime. We agree that real world scenarios and time are a risk factor but GAF and independent labs agree that 60 mil EverGuard and EverGuard Extreme, as well as Firestone® TPO products, have no problem handling 37 years of extreme abuse.
A lot of the anti-TPO rhetoric you’ll hear is also based on confusion with thermosets like PVC and the various PVC alloys which have chemically bonded seams. In the past, these seams have had a negative track record. PVC had other pitfalls that would have sunk it below EPDM by a few points in a similar tally. The thermoset family legacy haunts TPO but it is slowly making a significant impact.
Call the commercial roofing pros at Roofing Annex to learn more about upgrading your flat roofing to a TPO membrane from GAF. We can perform an in-depth evaluation of your roof and let you know it’s condition and provide a free estimate for its replacement.
513.685.9092
The post Compare Single Ply Roofing Membranes for Low Slope Commercial Roofs appeared first on Roofing Annex.
]]>Skylights can be found on just about every other home in the median price range. They’re a functional way to save money, and they nourish the brain by ushering in real sun rays. Like all parts of a home, skylights…
The post Replace Skylights When Replacing Your Roof – Yes or No? appeared first on Roofing Annex.
]]>Skylights can be found on just about every other home in the median price range. They’re a functional way to save money, and they nourish the brain by ushering in real sun rays. Like all parts of a home, skylights have lifespans, but there is one instance that may disrupt the tenure of a skylight: roof replacement. Having to replace a roof is a serious issue, and it certainly brings up the question of whether or not to replace skylights.
If you look around the online forums, you’ll see a good deal of debate on this subject. Roofers, handymen, DIY warriors and homeowners often chime in with conflicting answers like:
- Your skylights will be fine.
- Just add extra caulking around the skylights.
- You’ll need new flashing around the skylights.
- Always replace skylights when installing a new roof.
- Only replace certain types of skylights like the bubble kind.
As an elite roofing contractor with decades of experience, Roofing Annex can safely say that only one of these is the correct answer.
Always Replace Skylights When Getting a New Roof Installed!
We can’t stress this enough! A roof replacement is a big deal. The tear-off phase is certainly going to disturb your skylights. There are no kitten gloves that can stop this. Even the best and newest skylights stand a large statistical chance of being compromised. Wood frame, bubble and plastic panes, and skylights that open are extremely likely to fail.
Be sure to get an expert roof inspection and report that provide details of your skylights. From Cincinnati to Dayton, Roofing Annex is the professional you need!
Call us for a FREE EVALUATION – 513.685.9092
What Goes Wrong With Skylights?
There are several seal points that can be disturbed enough to let moisture in. As always, once moisture gets a foothold, it begins to do one of several things:
- Leaking – Water immediately finds the quickest route in. This is a physical leak that one can observe dripping. A busted seal can be impossible to detect while a roof is replaced. If the problem is small, it will lead to another issue.
- Warping of moistened material – In conjunction with hot and cold temperatures creating swelling, the area affected grows over time. Typically, within a year of your roof replacement, this warping will lead to water staining the ceiling as well as the possibility of actual leaking.
- Rotting – Should rot, lichens or mold find a foothold, the rate at which the affected area swells can be intensified, and leaking will surely occur within 18 months.
Why Don’t New Caulking and New Flashing Help?
There are too many points that could have been blown below these top most protective points. These first defenses do fine with vents and chimneys, but tend to do a poor job securing a skylight for long due to the nature of the skylight being a large, semi-flush and heavy port in a roof.
Is There Any Circumstance in Which a Skylight Can Survive a New Roof?
Obviously, there is always a chance any skylight can make it through a tear-off, but there is only one scenario in which there’s a fighting chance that a skylight will make it. If the skylight meets these points, we’d give it a better than 60 percent chance of survival:
- The house was designed and built with it.
- It is static (non-opening).
- It is a top brand.
- There is now wood used in its construction and boxing.
- The pains are glass.
- It is no more than 10 years old.
How many times have we seen this scenario? Pretty much never as most roofs are over 12 years old by the time they need replacing.
Who’s at Fault for a Leaky Skylight That Isn’t Replaced After a Roof Installation?
Any good roofer will insist that homeowners have their skylights replaced no matter what. A top roofer will not make it mandatory, but they will outline the seriousness of the situation. Ultimately, homeowners are responsible for their skylights, but a solid roofing contractor will always inspect the area if called on to do so.
At roofing Annex, we routinely get calls about a skylight issue about a year after a roof install. It’s on us to take a look and evaluate the situation. Depending on the nature of the damage, we will repair the issue, typically for a fee, or recommend a skylight company to repair or replace the skylights.
A Skylight That Fails a Year After a Roof Is Installed Creates Another Problem!
It may cost a bit less to have a skylight installed during a roof replacement because it’s easier to put it in while the decking is bare. If this isn’t done and leaking ensues a year later, there is going to be a big problem. It won’t be the cost or the hassle, but the fact that now your roofing system will need to be disturbed to repair or install new skylights. Just as the skylights were compromised, now too will your roof face similar issues with blown seals.
Don’t risk your property, wallet and sanity — get your skylights replaced when getting a new roof!
The post Replace Skylights When Replacing Your Roof – Yes or No? appeared first on Roofing Annex.
]]>When it comes to homeowners insurance, most folks have a vague understanding of their policy type and its cumbersome wording. What’s more troublesome is that states that experience hurricanes, tornadoes, and large hail are shifting towards a less favorable type…
The post Insuring 20-Year-Old Roofs is a Growing Problem appeared first on Roofing Annex.
]]>When it comes to homeowners insurance, most folks have a vague understanding of their policy type and its cumbersome wording. What’s more troublesome is that states that experience hurricanes, tornadoes, and large hail are shifting towards a less favorable type of coverage: Actual Cash Value (ACV). Sometimes policies are even switched to ACV in states where weather is the most extreme. Sadly, the most concerning trend in insurance is the requirement of a health check on roofs more than 15 or 20 years old. If there is an issue, you’ll be forced to correct it before getting a standard Replacement Cost (RC) policy or be forced into an ACV policy. Insuring 20-year-old roofs with RC policies is already near impossible in states like Kansas and Florida.
Let’s step back and take a closer look at these two policy types.
As you know, the basic purpose of insurance is to cover a loss that you have suffered. As policy holders, we would like to only pay our deductible on a claim and have all repairs paid for by the insurer. That’s a Replacement Cost policy. It’s often paid in two sums: half up front and the rest when work is completed.
Actual Cash Value takes depreciation into account, in a multitude of ways, to determine what you receive to cover your loss. For instance, a roof predicted to last 30 years will be assumed to have zero value at the end of that timespan. So, if the roof is somehow destroyed 15 years after installation, the ACV will be half of the original cost of the roof.
Actual Cash Value = Replacement Cost – Depreciation
The upswing on these ACV policies is that they are often less expensive than RC and may have a smaller deductible.
The Problem with Insuring 20-Year-Old Roofs
As mentioned, a growing number of insurers will want to look at your roof of 20+ years before covering you. In areas like Cincinnati, where hail and wind tend to destroy roofs twice as fast as average, it behooves profit margins for insurers to look at receipts and warranties of roofs, along with an inspection report, to determine their plan of action. Many new home buyers will be looking at decent older roofs; but a report may say different, and the outcome may be a replacement request to access an RC policy. Most people with low finances will opt into an ACV policy and enjoy lower premiums, while a few may still be able to obtain an RC but have an inflated premium due to the poor condition of the roof.
Other hard to insure home types
Why is 20 the magic number of years? The average life expectancy of asphalt shingles is 40 years. Hence, the half-life point is a good place for insurers to start. But there’s more to it, and there’s a reason why some insurance providers want to look at roofs at 15 years of age. This is the age at which the elements start to drastically affect the average asphalt roof. At around 12 years most shingles will begin to get stiff/brittle and the granules coating the surface will slowly lose their hold. This natural aging is not the ACV depreciation factor insurers are looking at, simply the intelligent point to be careful and opt for an inspection.
Anyone with an older roof that fails an inspection should look into full replacement even if there are just small repairs requested. Why? It’s a great investment that will:
- Make it easy to acquire an RC policy
- Lower your premiums
- Add value to your home on resale
- Beautify you home
Learn how else you can cut insurance costs here
ACV Insurance Claim Payout Example
An ACV policy subtracts the depreciation from the replacement cost. Thus, insuring 20-year-old roofs with issues is great for insurers. They know total failure is around the corner and are ready to help out and still be in the black. The following scenario should make it clear how this policy works:
Joe buys a 20-year-old home with its original roof and seeks homeowners insurance. His insurance agent schedules an inspection due to the age. The report shows that there is a good deal of granule loss and some notable wind damage…this is Cincinnati after all. The agent requests that Joe pay to repair the wind damage at the cost of about $1,500 or replace the roof before the home can be covered by an RC policy. The agent will likely omit the part about saving on premiums with a new roof, but will highlight the high cost that just repairing the roof will leave. Then the ACV option will come out. Depending on the insurer, the repairs may still be needed as age and the degree of the issues will factor in.
Joe—who knows nothing about roofing—looks at his roof, which appears fine to him, and thinks about saving that $1,500 and another $300 a year with the ACV policy. He makes the cheap call. Joe’s happy and feels safe; but then a hailstorm destroys his roof five years later. Just as water damage is starting to show, he calls his agent to schedule an inspection.
After the inspection, Joe gets a call from his agent with the prognosis. He’s informed that the roof is totaled and the “like kind and type” roof replacement will cost $14,000. Joe’s first question is: “How much will this cost me?” This is where it gets yucky with his ACV policy.
The original roof cost $10,000 and came with a 40-year warranty. The policy took the depreciation factor to mean that the now 25-year-old roof lived 62.5%. This was applied against the original price of the roof to give the depreciated roof value of $3,750 and a depreciation value of $6,250.
Hence, the agent said: “We’re paying the repair cost of $14,000 minus the roof’s current depreciation value of $6,250 minus the $1,000 deductible.” That left Joe having to pay for the other $7,250 to have his roof replaced.
Did that make sense?
No? Say the roof was only 10 years old and had a 50-year warranty. The depreciation value of the $10,000 roof would be $2,000 (20%).
$14,000 Repair – $2,000 Depreciation – $1,000 Deductible = $11,000 paid toward repairs by ACV policy.
This new roof scenario isn’t bad, plus it made the premiums as low as possible. The same equation is used for all other losses in the home and its contents.

Insuring 20-year-old roofs is often even harder if small repairs are needed.
What did we learn from all of this?
- Insuring 20-year-old roofs is getting harder.
- ACV policies are cheaper but leave you paying a lot more when disaster strikes.
- A new roof will save you money on premiums—especially if the warranty is for 50 years.
The post Insuring 20-Year-Old Roofs is a Growing Problem appeared first on Roofing Annex.
]]>It’s safe to say that our restoration experts have inspected thousands of roofs in the Cincinnati and Dayton area over the last few years. In that time, we’ve see a lot of DIY projects go horribly wrong on windows, doors,…
The post The 7 Worst Roof Repairs Homeowners Perform appeared first on Roofing Annex.
]]>It’s safe to say that our restoration experts have inspected thousands of roofs in the Cincinnati and Dayton area over the last few years. In that time, we’ve see a lot of DIY projects go horribly wrong on windows, doors, ventilation, siding, and, of course, roofing. In no particular order, we present the 7 worst roof repairs homeowners perform to a startling degree.
- Reroofing by adding a new layer of shingles: We’ve torn off roofs with 3 layers of shingles before. The homeowners usually site that they just wanted a new color or that their roofer told them it was a totally okay money saver. All it takes is the old bottom layer to have an issue and the whole roofing system fails. The extra cost associated with the removal time and disposal is cringeworthy. This may be the worst thing we’ve seen particularly due to the wasted money spent on the short lived second and possible third layers. Of the worst roof repairs homeowners perform, this one can cost the most in the long run.
- Trimming all parts of a tree except for those overhanging the roof: Perhaps the roof makes it too hard to reach branches with an extension trimmer or perhaps it’s just negligence. You never want branches hanging over your roof. This is asking for clogged gutters that fail and for moss growth on the shingles. Non-repairs equate to our second issue…
- Power washing roofs to remove moss: Some homeowners take this a step further and sprinkle bleach on the affected area. Both these “cleaning” techniques are highly destructive to shingles… Not to mention unsafe!
- Cleaning gutters from the ground: It’s easy to spot a gutter that was improperly cleaned with an extension poll or extension hose. Sludge is often built up thick in the worst points possible. It then takes just a few bits of debris to cause a A plugged-up gutter is heavy! It can literally snap, burst, or break free from the roof. In some cases, we’ve seen gutters take pieces of the roof with it when it collapses.
- Pulling up shingles to look for leaks: Yes, most people wouldn’t do this but it’s been done before. We often see caulking and other repairs under shingles during tear-offs. This is just asking for more leaks!
- Adding or repairing skylights: This is not a clever idea unless you do it for a living. Skylights are one of the leakiest components to a roof there is.
- Doing anything to ports, vents, or chimneys. This follows skylights as being something left to a professional. Chimneys feel particularly safe to work near and on which is why the roofing around them tend to suffer. Tools, shifting around, debris, and damage to its flashing are common issues that can be worrisome.

There are a few rules to roof maintenance. They are constantly broken and end up costing homeowners more down the road. We hope you avoid the following:
- Walking on your roof – no matter the grade
- Power washing
- Patching leaks from the roof surface
- Ignoring overhanging foliage
We hope you avoid the mistakes we’ve shared here and seek a professional before combating your roofing issues.
Need to Replace Your Windows?
Contact Us Today to Schedule an In-home Consultation – 513.685.9092
The post The 7 Worst Roof Repairs Homeowners Perform appeared first on Roofing Annex.
]]>Most homeowners think style, color, or price is the most important feature when looking to replace their roof. Nothing could be further from the truth, as none of those will protect your home. There are 3 symbiotic components that make…
The post The Truth About Roofing Warranties appeared first on Roofing Annex.
]]>Most homeowners think style, color, or price is the most important feature when looking to replace their roof. Nothing could be further from the truth, as none of those will protect your home. There are 3 symbiotic components that make a roofing system one of true value; The products, the roofer, and the manufacturer of the roofing system components who backs it all via a great warranty.
Allow us to sum this all up and explain why we offer “The Last Roof You’ll Ever Need”.
The Best Roofing Products Come from those Who Strive to Be the Best
GAF, North America’s largest manufacture of shingles and full roofing system components, carries the best accolades in the industry. GAF has sought to make better and better products through solid research and development. They have more options, a better reputation, and finer warranties than any of their competition. It’s no wonder they get stamps of approval from Better Housekeeping every year.
Manufacturer Backed Roofers are Superior
When a manufacturer like GAF designates a roofing company with a title like Master Elite Contractor, they are saying that they have total confidence in that roofing company to provide a perfectly installed roofing system. Out of the countless roofers in the Cincinnati region and beyond, only 2-3% of those roofers make this cut. Roofing Annex is proud to be among those 2-3 % and has maintained this title along the highest reviews from customers polled by GAF out of those few. This certification also allows us to offer 2 exclusive warranties from GAF. They do come with price tags as GAF will come out to inspect the work before issuing the warranty. Unlike most roofers, Roofing Annex covers the cost of one of these warranties to ensure each roof is backed up.
A Warranty with Real Value
A standard roofer without manufacturer certification will have a 1-5-year workmanship warranty of their own and product warranty on the shingles that will last 20-50 years depending on the manufacturer. The problem with that is that the roofer may cause an issue that voids the manufacturer’s warranty. This puts them on the spot and if they’re a young company with a few instances of fault there is a chance they won’t even be in business to honor their own warranty for that period.
Studies have shown that over 35% of new roofs installed by non-certified roofers fail within 5 years. Couple this with the fact that most roofing companies are not in business more than 6 years which resolves in a big problem.
GAF trusts their products to last and they trust their Master Elite roofers to install them correctly. They prove this with their warranties. The following breakdown highlights the many pluses of the GAF warranties alongside the average industry warranty.
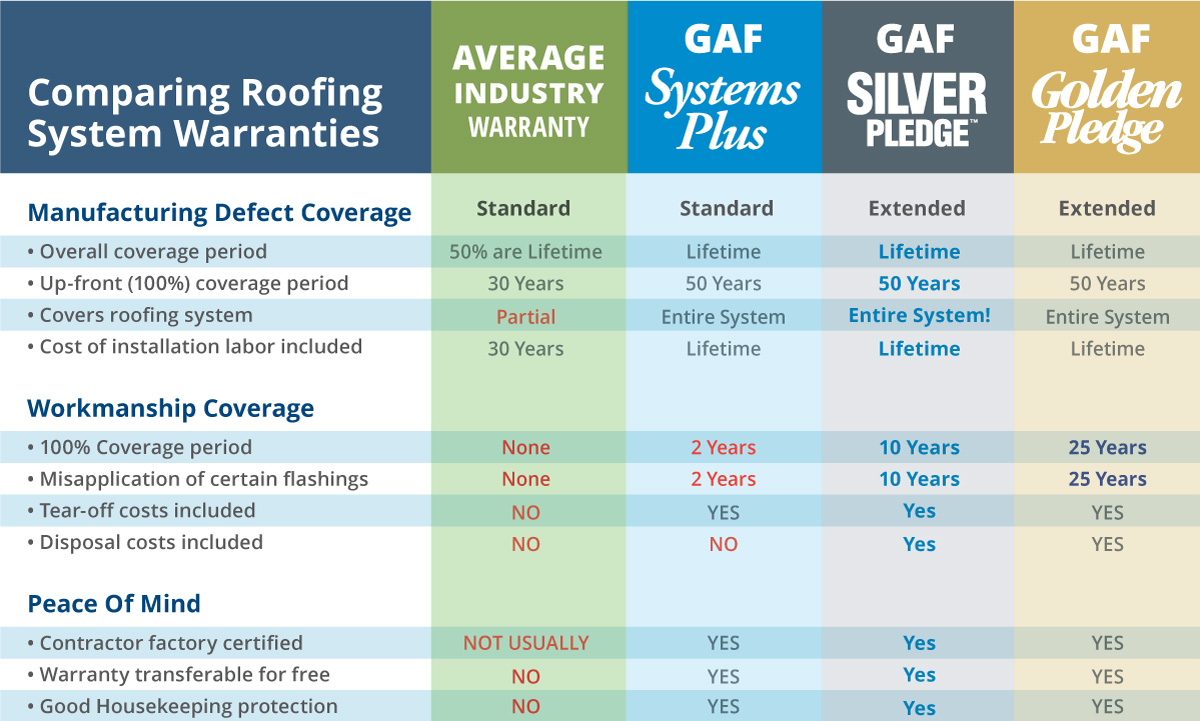
The sad truth about roofing warranties from other manufacturers is that they don’t cover you for much. Many shingle manufactures just make the shingles and leave out other roofing system components. This in turn means that they probably have no extended warranty or roofer certification. This leaves you having to trust that your roofer is impeccable. The average warranty just doesn’t compare to the basic GAF Systems Plus Warranty.
Perspective
A perfectly installed A+ roofing system with a great warranty is obviously the most important choice. It can obviously be the color and shingle design you’re looking for and the price doesn’t have to stink either. A roof isn’t like buying any name brand of peanut butter that tastes about the same as the generic names. It’s much more like buying a car. Some are high quality and overpriced while a Honda has all the safety features, reliability (maybe more), comfort, and a fair price tag. A new car comes from certified dealership (like a roofing manufacturer) and comes with a warranty. A used car can obviously be an excellent value but they don’t come with good warranties if any at all.
Truth about roofing warranties is simply that they are not anywhere near equal. Thus, it’s important for consumers to shop for a roofer backed by the likes of GAF, CertainTeed, or Owens Corning.
Looking for a roofing contractor in the Cincinnati or Dayton area? Roofing Annex is ready to address your roofing concerns with world-class service, solutions, and warranties.
Online Scheduling – 513.685.9092
The post The Truth About Roofing Warranties appeared first on Roofing Annex.
]]>As a leading commercial roofing company in the Cincinnati and Dayton area, Roofing Annex is well aware of the stresses felt by property owners and managers when it comes to multi-family unit roofing projects. The larger the property, the more…
The post A Property Manager’s Guide to Multi-Family Unit Roofing Projects appeared first on Roofing Annex.
]]>As a leading commercial roofing company in the Cincinnati and Dayton area, Roofing Annex is well aware of the stresses felt by property owners and managers when it comes to multi-family unit roofing projects. The larger the property, the more tenants, the more overwhelming things get for those calling the shots. Our goal, from the moment we meet with prospective clients is to ease the tension by reviewing where they are at. We’ve met seasoned pros, uneasy professionals, and total novices that are no more prepared for the unexpected than the other – just as we’ve seen light planning and budgeting from all types. Hence, we’ve put together the following guide to multi-family unit roofing projects.
Much of this is a no-brainer and redundant for most but it bears repeating!
Step 1) Identify and Set Priorities
Residential complexes are always going to be complicated whether you’re looking for roof maintenance, roof installation, painting, siding replacement, or gutter cleaning. Assuming you’ve found a trusted building contractor with expertise in multi-family housing to tackle your needs, it’s time to pinpoint necessities. Ask your contractor to do an in-depth exam of the entire property to evaluate all possible issues. Once the issues for correction have been identified you’ll need to look at your budget alongside your contractor’s estimate and begin prioritizing. At Roofing Annex, we know that this can be difficult so our estimates include our two cents on prioritization. For example, we set critical leak areas like pipe flashings and missing sealants high and a change in gutter colors low. We advise you to ask this of any contractor you work with.
Step 2) Double Check your Plan with Tenants
The biggest mistake we’ve seen while conducting maintenance on multi-family units in Cincinnati is a lack of tenant input on the priority list. They may not understand the severity and need for certain items in your plan because others affect them more. Anger and resentment from residents can flare up if they see gutters replaced but wanted to see old deteriorating skylights replaced. Some communities will have suggestions coming in anyhow but it’s wise to ask around and get a consensus of pecking order to build a compromise. Be sure to consult with your contractor once the plan is altered to see if the plan fits their concerns.
Step 3) Review the Maintenance Estimate
Most commercial property management companies we’ve worked with tend to get multiple estimates when the project is larger while smaller issues are left to the maintenance company. Should you be reviewing multiple estimates be sure to evaluate them as apples to apples on the materials as some contractors will save a buck by using crummy products. We also advise using the company that can provide the best warranty on your products and their workmanship.
Need an Estimate?
Contact us Today! 513.985.9092
Step 4) Communicating the Project to the Residents
Posting clear signage and distributing letters or flyers with the project dates and schedule is imperative. We’ve never seen this not done but tenants will see those notices weeks in advance usually and forget. Thus, we suggest having one last round of flyers go out the day before with further details on the plan of action. Your contractor should be able to handle the rest. With a roof replacement project, for example, the crew will arrive early and cone off areas to avoid (sometimes the evening before). Caution tape and other notices will be posted to direct residents to safe parking, safe walking paths, and off limit areas.
Step 5) Ongoing Communication during Multi-Family Unit Roofing Projects
Property managers should be available during larger projects such as tear-offs and installs of roofing or siding. Larger complexes with several dozen or more units need ongoing clarity between residents, the management company, and the contractor’s onsite team leaders. Appointing someone from your end to represent the management company or an owner to stay on the premises or someone that can always be reached is the best way to clear unexpected hurdles. You’d be surprised how often the lack of representation happens and how bad things can get without it.
Step 6) Review the Work
Having a thorough understanding of the work performed is essential. Be sure that the project manager on hand is able to walk a representative around the property to look at the repairs and replacements along with spots of concern. Be sure to take photos along the way!
We hope you enjoyed our guide on Multi-Family Unit Roofing Projects and hope you explore other blogs for commercial roofing.
The post A Property Manager’s Guide to Multi-Family Unit Roofing Projects appeared first on Roofing Annex.
]]>Even though we are a full service restoration company focused on roofing, siding, widows, gutters, and doors, we still get more calls regarding roof issues since it’s in our name, Roofing Annex. So let’s take a look at those issues…
The post The 4 Most Common Roofing Problems appeared first on Roofing Annex.
]]>Even though we are a full service restoration company focused on roofing, siding, widows, gutters, and doors, we still get more calls regarding roof issues since it’s in our name, Roofing Annex. So let’s take a look at those issues that come up the most for homeowners. If you live in the greater Cincinnati area, our service records show that these are the 4 most common roofing problems that bring the fear-of or actual leaks:
- Clogged Gutters & Downspouts
- Deteriorated Pipe Boots
- Deteriorated Shingles
- Rotten Fascia
Let’s take a look at these issues one-by-one:
Clogged Gutters & Downspouts
Debris reacts with water to form sludge in gutters that can reduce the lifespan by overburdening with weight and corrosion. If overflows occur water can penetrate the siding as well. Clogged and overflowing gutters typically need one good windstorm to cause breakages and tear-offs. Simple checks and cleanings in the spring and autumn can make a huge impact. Seeing as how we replace dozens upon dozens of gutters and downspouts in Cincinnati and Dayton every year, we can note that a clog can still happen unexpectedly during a severe storm even if the gutters were recently cleaned.
Read more about knowing when to replace your gutters and downspouts.
Deteriorated Pipe Boots
A vent pipe boot is a type of roof flashing that consists of a metal or plastic base with a rubber, dome-shaped boot that fits snugly over a plastic vent pipe. The base lies flat against the roof with its top portion covered by the shingles above to shed water. The most common failure with this type of flashing occurs when the boot cracks or peels away from the pipe allowing water to penetrate the roof. The rubber boots deteriorate quicker in areas like Cincinnati due to our annual shift it temperatures along with sun exposure. Replacement is typically easy and inexpensive. We always advise replacing all boots if one fails. Note that a failed boot will always result in a leak as the pipe is always protruding through a hole in the decking for water to run through.
Deteriorated Shingles
Where you live has a lot to do with how long your roof lasts. The Cincinnati to Columbus area is in a zone that sees a good deal of pounding windstorms, several inches of snow accumulation, hot summers, and a fair amount of hailstorms producing hailstones in excess of an inch in diameter. This harsher weather means that we in Cincinnati will be lucky to see more than 30 years out of our roof while the same roof in California will see 10 to 30 more years. This is based on the average roof warranty of 40 years for a dimensional asphalt shingle but the concept applied to other roofing types. Hence, it’s wise to use solid products with the longest lifetime warranty available. This is why Roofing Annex gives its clients, free of charge, the coveted Silver Pledge Warranty on all GAF roofs. Our rare designation as a Master Elite Contractor means we can offer this exclusive transferable warranty that backs up all products for 50 years and workmanship for 10! It’s the best deal in the roofing biz!
Back to shingle deterioration…
One of the earliest signs of roofing shingle deterioration is the shedding of granules. The granules that coat the surface of the shingle lose their bond naturally with time in the elements. Next, there are signs of cracking and the shedding of corner tips. Also common is the appearance of staining. This can be caused by several factors but what you’ll see is a lighter or darker patch or patched resembling drapes. Intense hailstorms will knock off granules and also create pock marks. If the amount of damage is intense you can file an insurance claim to repair or replace your roof. Severe hail damage will cause a roofing system to fail sooner than later.
Rotten Fascia
The fascia is a lower part of the roof that covers the eaves. The rain gutters are just below the fascia. Built-up debris above the gutter will contribute to a rotten fascia because the area stays wet and rots. A leaking fascia is important to tend to because it can mean that moisture is getting into the eaves. Mold and rot can spread in humid areas, like Cincinnati, to cause bigger problems. The best time to replace the fascia is when the roof is being replaced.
The post The 4 Most Common Roofing Problems appeared first on Roofing Annex.
]]>As Cincinnati’s leading contractor for exterior renovation, Roofing Annex enters countless bids for restoration work. Part of the process homeowners go through with their project is that of comparing estimates from several competing companies for roofing, siding, gutter, copper dormers,…
The post 5 Step Renovation Budget Guide appeared first on Roofing Annex.
]]>As Cincinnati’s leading contractor for exterior renovation, Roofing Annex enters countless bids for restoration work. Part of the process homeowners go through with their project is that of comparing estimates from several competing companies for roofing, siding, gutter, copper dormers, or whatever their needs are. From our perspective it appears that most homeowners fall short on putting together a realistic budget. Hence, we wanted to share a great article from Houzz that offers a clear 5 step renovation budget guide. Note that the article was written for a full home project standpoint but the concepts all apply even if you’re just looking to replace windows or add a sun-room. For a quick summary with our input we offer the following before going on to the full Houzz blog:
5 Step Renovation Budget Guide Summary
- Create Your Dream Plan – After you or a pro has designed the plans or agenda for your renovations it’s time to prioritize the list of renovations in the scenario that you can’t afford all of them at once. Houzz says to make a list of those things that drives you crazy about your current situation but we advise that you take a more serious approach and plan around making sensible decisions that have the most impact for functionality and monetary value.
- The Budget Check – It’s time to show your plans to contractors to get the first dose of reality. You’ll want to get 3 estimates and find the average – of course. Our advice is to take that average and ad 20% back on to play it safe and realist. After all, these rough estimates were not actual bids. Compare this to your plans and make a real set budget for the items that make sense.
- Get Apples-to-Apples Pricing – Now it’s time to get real bids. Roofing Annex is keen on this note as many contractors don’t offer in depth line item estimates or explain why it’s best to use certain products. Make sure your product prices are set in stone.
- Refine Your Vision to Match Your Budget – It’s likely your plans and budget are still not synced with the estimate(s) you’re looking at. After the apples-to-apples review it should be clear who you want to use despite pricing. This is where you may have to shed or alter plans to fit your budget as the opposite is rarely the case. Choose the right contractor and work with them to refine your plans to fit the budge. You may be surprised how accommodating your contractor is to work within your budget suddenly to give you what you want.
- Pay for Due Diligence – When your revised plan is set it is advisable to do a little extra due diligence work to make sure your plan are in fact sound. Your contractor may also be able to do the same for you and show you their findings. What’s this mean exactly? It is a look at worst case scenarios of things going wrong; dry rout found while removing old product, core construction flaws in the home, the need for new insulation, etc..
Learn how the exterior renovation experts at Roofing Annex can assist You
Book a consultation online or by calling 513.685.9092
The original article from Houzz:
Dream to Done: How to Refine Your Renovation Vision to Fit Your Budget
Matching your renovation dreams and dollars can sometimes feel like a challenge. But there’s a lot you can do to get the look you want at the right price. In the first story in this series, we laid out the steps in choosing the pros you will work with and setting an initial budget.
Here we’ll focus on how to work with your professionals to sharpen your renovation vision, understand its realistic cost, and refine the plan to match your budget when necessary. You’d follow the same basic process if you’re acting as your own general contractor.
Create Your Dream Plan
Once you’ve chosen the pro (or pros) who’ll be designing and drafting your renovation plan, you’ll move into a deeper conversation about your vision. To prepare, make a list of the things that are driving you crazy about your house. Collect images of homes that inspire you. Your chosen architect, designer or builder will likely ask you a range of questions about how you use the space and how you live day to day. He or she will also want to get a sense of the materials and styles you prefer.
“I think it’s good to share with the architect the pie-in-the-sky ideas,” says Jon Dick of Archaeo Architects in Santa Fe, New Mexico, who has been practicing for 30 years and has worked on more than 100 homes. The architect may not incorporate them, but “there might be one nugget of an idea that might inform the whole project.”
These initial conversations are invaluable as architects and designers work through the stages of a project, from initial design plans to final drawings and permitted plans. This design-then-revise process is key to creating a plan you love — that also matches your budget. And it’s part of why coming up with a new home or renovation plan takes time.
The next step is getting a measured drawing that shows the home’s existing conditions, or an accurate rendering of the house as it stands before renovation. “We measure the whole house and get an electronic copy,” says J. Timothy Hance, an architect in Columbia, South Carolina, who has been in business 21 years and has worked on about 850 homes. What the American Institute of Architects refers to as a measured drawing of existing conditions is sometimes called an as-built, so clarify what you mean with the pro you work with. “Once you have an as-built, you’re not throwing away money.… The more information you can put out on a sketch on paper, the less likely you are to make a change in the field or have a surprise.” The drawing becomes a useful tool as the architect creates the renovation plan. These drawings may be done by a design-build firm, general contractor, architect or interior designer.
Next Stop: The Budget Check
Once the architect or designer has crafted initial drawings with dimensions, it’s time for an initial price comparison from contractors, also called a rough order of magnitude cost comparison. This is when you send initial plans out to contractors for pricing. Keep in mind that these aren’t bids — which in the best (though not all) cases are extremely detailed assessments of what a project will cost to build. Instead, these initial price comparisons are reasonable ballparks for how much a project might cost to build. Keep in mind that the final number will depend on which finishes and materials you, the owner, select.
To come up with the rough order of magnitude cost number, the contractor will likely count up the number of doors and windows, look at electrical and plumbing systems, and build out line-item costs based on average per-square-foot costs for the work proposed. “Maybe one contractor says it’s $100,000, another says $150,000, another $200,000,” says Anne Higuera, co-owner of Seattle-based Ventana Construction, which has worked with some 250 clients since it was founded in 2003. The goal of this initial price comparison is to feel confident enough about the likely cost of your project to move ahead with the architect or designer and pay for additional work to finalize your design plan. “It’s a tool. It’s useful,” Higuera says.
Most of the time, contractors will do the initial price comparison for free, though in parts of the country, an increasing number of firms are beginning to charge.
Get Apples-to-Apples Pricing
Even without fully engineered plans, you can create some standardization among your initial price comparisons by providing contractors with allowances — an industry term for specific cost projections — on items that haven’t yet been selected, such as plumbing, fixtures, sinks or lighting. Ask your architect to provide these — perhaps in unit terms, such as $10 a square foot for tile, or in rough group costs, such as $10,000 total for cabinetry. That way, the only variation between the bids you get are the fees the contractor will charge you for labor, project management, overhead and other costs of doing business.
Once the numbers are back, your architect or designer can review the initial price comparisons and make sure that the contractors have included the same features. There is no standard way to write up these price comparisons, so one contractor may include all the millwork in the “cabinetry” line item, and another may forget to include the metal supports needed for a kitchen countertop. Your designer can provide a careful eye on the rough order of magnitude costs that come back from the contractors and make sure what has been priced is apples-to-apples.
Refine Your Vision to Match Your Budget
Once you receive the initial cost estimates, reality will hit. If your dream plan pencils out at more than your ideal budget, your architect can use these cost estimates to help you scale back. For example, you may have planned for beautiful custom cabinets that stretch to the top of your 12-foot ceiling. You may not have known that by raising your upper cabinets, you’ve almost quadrupled the cost because your standard cabinet doesn’t go to 12 feet, says Tanner Luster, a general contractor at Luster Custom Homes & Remodeling in Scottsdale, Arizona, who has worked on about 250 homes. So you’ll begin to look at alternatives that better match your budget. This process is known as value engineering.
Even owners fortunate enough to have flexible or even unlimited budgets must decide what features are really worth the price. These are very personal decisions, but as a guideline, it can be helpful to ask yourself what matters most to your family. “What are your top five priorities? What do you want to get out of it?” says Hance, the South Carolina architect. Some clients may know they want a wine cooler. Others may say, “I really want that stove, but I can give up this dishwasher,” Hance says.
Now is a good time to select your contractor from among those who provided initial price comparisons. Contractors can be a big help in working with you and the architect to suggest lower-cost alternatives as your plans develop, but some will go through a round of competitive pricing only once. Still, many contractors, once hired, will work with you to do subsequent price comparisons as you and your architect or designer continue to hash out the details and value-engineer.
Hashing out these details is an iterative process until you reach a fully designed plan with all the products and materials specified and priced. You’ll move from initial concept to fully engineered plans over several iterations. Along the way, you should select all your materials if you can, as this will go far in making sure that you don’t go over budget later.
Having a good design team on board early in the process can help you determine where to compromise as well as guide you in all the decisions you’ll need to make. “Get all those people together,” advises Brandon Quinton of Cameo Homes in Salt Lake City, a family-run general contracting firm that has been in business since 1976. “The interior designer, they’ve got to collaborate with the architect. The builder just wants to know what to put in.” Together, your team can come up with the best plan for the money. Quinton suggests getting everyone in the same room to hash out the plan, though in this internet age, people could also hold a meeting by phone or Skype.
In this story, we’re laying out a process that is most likely to get you the project you want at the budget you want. You wouldn’t want to put a lot of money into fully developing plans only to find that they are too expensive for you to build.
Pay for Due Diligence
When your design plan is nearly complete, you may want to pay your contractor for a little extra research upfront before you finalize the project scope and budget. “If we’re going to pull out a wall, we want to know: Is it a structural, load-bearing wall? Are we seeing signs of some rot or some water damage?” says Luster, the Arizona contractor. Unanticipated problems can range from a thousand to tens of thousands of dollars to correct, he says. If you have to pull out and replace rotted wood, maybe that Sub-Zero appliance gets nixed.
Some contractors make pre-construction due diligence a regular part of the process. Even if your contractor doesn’t normally take this step before commencing work, you could ask how much he or she would charge to do so. Luster has charged as little as $200 for minor research and as much as $12,000 for a full set of architectural plans. It can be a good step to take before you sign off on the final plan with your contractor, as this kind of research could change the scope of work — and the price.
The post 5 Step Renovation Budget Guide appeared first on Roofing Annex.
]]>As the multitude of blue tarps attest, the March storm damaged roofs throughout Florence, Kentucky in a big way. There are two big concerns that homeowners are being faced with in the wake of the high winds. First, the vast…
The post The March Storm Damaged Roofs throughout Florence, Kentucky appeared first on Roofing Annex.
]]>As the multitude of blue tarps attest, the March storm damaged roofs throughout Florence, Kentucky in a big way. There are two big concerns that homeowners are being faced with in the wake of the high winds. First, the vast property damage has brought predatory contractors flocking to the area by the dozens. Secondly, while on service calls in the area, our team has noted that even homes with minimal to no signs of damage, from the ground, have hidden issues upon close inspection. This article will elaborate on these two issues and give you industry insider facts that can save you from serious grief.
Predatory Roofers in the Wake of the March 1st Storm in Florence
A predatory roofer is one that leaves you high and dry after typically worthless repairs are made. They may never even make the repairs in some cases. Even if they seem so helpful when they come to your door, tarps in hand, they are looking to grab your insurance check and run. They will typically repair or reroof your home but they won’t be there if anything goes wrong with their work. In most cases there isn’t even anything more than a low grade manufacturer’s warranty to back the products they use… which doesn’t cover workmanship.
We’ve seen just about as many suspicious yard signs in Florence as we’ve seen local brick and mortar companies represented. These fly-by-night roofers, also known as “storm chasers”, are seen driving around even weeks after a storm such as the one here. That’s why we want you to be aware of the tell-tale signs your roofer is a predatory contractor:
- Shows up at your door with little to no company branded clothing, print materials, or properly vinyl printed branding on their truck.
- Wants you to sign an agreement to work with them because they inspected and put a tarp on your roof. This is not a legal document in any way!
- Pushy on speeding along the process – they may want to start work once your claim is approved – before having a check in hand.
- They may be from the other side of the state or from several states away.
- They will not be able to provide a long list of local references that can be verified.
- They will not pass a simple google search for credibility.
- Predators won’t have a good standing with the BBB in the area.
- They won’t be certified with a shingle manufacturer. This can be checked out on the shingle manufacturer’s website.
- Their estimates are usually not very detailed. They won’t spell out every piece of the roofing system required for the job.
BE SURE TO GET A SECOND OPINION A& ESTIMATE
Low grade local companies may be almost as bad as predatory roofers. Avoid working with a company that displays any of these weaknesses as they too will often leave you high and dry. Issues to be aware of:
- Been in business less than 3 years
- Has no manufacturer backing
- Doesn’t offer any financing options
- Doesn’t have a physical office you can visit
- If they’re real local, and you haven’t heard of them, there is often a reason for that
- They do not want to help work with insurance even though you know it’s the right thing to do
- They don’t offer a 5 year workmanship warranty

Example of a clear target for predatory contractors to avoid. They tend to stick to just roofs and avoid larger tasks like damage done by trees.

This partial tarping is a clear case of a predatory contractor. It was a rush job secure “the vital part of the house” when all parts are vital. They likely wanted to conserve tarps for the next victim.
Invisible Damage
It can be quite hard to see wind damage – especially on newer roofs. Younger shingles are flexible and will often lie flat, in place, once the high winds subside. Older stiff shingles will often keep their buckled form if they happen to stay on. Hence, it’s a good rule of thumb to have your property thoroughly inspected after a storm like we saw on March 1st. If any of these are true it is wise to call a roofer:
- Any neighbors on your block have visible damage
- If you saw your shingles flapping during the storm
- If you’ve seen pieces of shingles in your yard since the storm
Get the best inspections, customer service, free lifetime warranty, and overall experience with Roofing Annex, the most trusted name in the Tri-State.
Book an Inspection and Consultation online or by calling 513.685.9092
The post The March Storm Damaged Roofs throughout Florence, Kentucky appeared first on Roofing Annex.
]]>Big ticket items like electronics and household machines come with manufacturer warranties that last 5 years or less. These things get human use, wear and tear, but the reality is that they are not built to last. Then you have…
The post Why a Great Roof Warranty is so Important – Roofing Insider Series appeared first on Roofing Annex.
]]>Big ticket items like electronics and household machines come with manufacturer warranties that last 5 years or less. These things get human use, wear and tear, but the reality is that they are not built to last. Then you have things like cars, heavy-duty machinery, and roofs that are meant to be in operation for a long haul. Roofs however don’t get human interaction. Roofing systems are at Mother Nature’s whim as well as at the will of the manufacture that seeks to produce long lasting products. A great roof warranty is very important because it shows us that manufacturers have faith in their products to last the ravages of time.
The shingles made today have been lab tested to last 25 to 50+ years of natural decay. Luckily, extreme events that Mother Nature hurls at a roof can likely be paid for with insurance. Hence, that’s another subject.
Because a roof installation involves more than just shingles, this home improvement is costly in both time and labor. The roofing system itself has many parts to it which raises the material cost as well. The under layers are every bit as important as the shingles you see and a great roof warranty will be able to cover 50 years because the installers used the correct materials outlined by the shingle manufacturers.
What a Great Roof Warranty Offers
1.) A great roof warranty offers protection against material defects. You’ll want a roof system that can take on the harsh elements without failing. The materials used for this play a key role in its performance and longevity. Once it starts showing signs of premature wear and tear, it might compromise your home’s comfort and energy efficiency. That’s where an excellent manufacturer warranty comes in, which includes coverage on material defects. This provides an extra layer of protection to your investment if your shingles start to fail long before they should.
What are the parts of a roofing system?
2.) A long coverage period is a must. Dimensional shingles should have a 50 year warranty available, otherwise you’re buying a subpar shingle. 3-Tab shingles typically don’t come with warranties over 25 years. 3-Tab shingles are less expensive to buy and installation time is slightly less but overall savings don’t equate to ROI dollars for home sellers or those looking to stay in their home for more than 25 years.

3-Tab shingles, like you see above, are an appropriate price for a shingle that rarely lasts 20 years but there isn’t any real benefit to this as that cost applies to just the product which isn’t always that much less than a stronger dimensional shingle. 3-Tabs are an overall poor investment.

A great roof warranty should cover a product for more than 30 years. Some brands look like others but if the warranty doesn’t stand for quality you may be looking at something like this. Early deaths look like this. Faulty and cheap shingles like Atlas’ Chalet series didn’t see 10 years of use in many instances.

Dimensional shingles can come in a variety of looks and thicknesses. Although designer shingles like GAF’s Camelot II (above) are costlier, the overall price is extremely less than cedar shake, and slate roofing while giving added protection that comes with thicker asphalt shingles.
3.) A warranty is insurance against poor workmanship. With a great roof warranty, you can avoid the stress and additional costs involved with improper installation. These warranties have coverage that protects you from flaws in the installer’s workmanship. Roofing companies usually carry a workmanship guarantee that may vary on the period of coverage (5-15 years). A good warranty will back that up for 3 years of installer flaws. This is because most issues come to light in the first year and an estimated 75% of all installer related problems are obvious within 3 years.
Because 70% of roofing companies don’t stay in business more than 8 years their warranties aren’t always a safe guard against their work. That’s why top tier warranties, like GAF’s Golden Pledge, are important for those who want the ultimate peace of mind. This warranty covers labor issues for 25 years! It also makes the warranty transferable which gives a potential home seller a great bonus and possible rise in home value
Learn About our 50 Year Warranty
Choosing the Best Shingles Should Depend on Who Has the Best Roof Warranty
A great roof warranty can be found if you know where to look. Our insider’s guide deals with the most popular roofing choice, dimensional asphalt shingles. Hence, we can tell you that the largest manufacturers have the best R&D to produce shingles that do what’s promised and back them up with the best roof warranties. GAF, CertainTeed, and Owns Corning offer just that. When it comes to extended warranties offered by manufacturer certified roofing contractors, there is no better than GAF’s Golden Pledge Lifetime Warranty. Only 3% off all roofing companies carry the title of GAF Master Elite™ contractor which means the contractor is certified to install a roof to spec and have it inspected by a GAF quality control representative.
Looking for a roofing contractor in the Cincinnati area?
Get a quote or call us to schedule a free in-home consultation – 513.685.9092
The post Why a Great Roof Warranty is so Important – Roofing Insider Series appeared first on Roofing Annex.
]]>